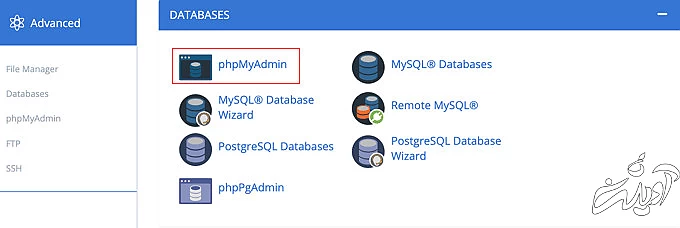
 Opening phpMyAdmin from CPanel
PhpMyAdmin comes pre-installed with most top WordPress hosting companies. You can find it under the Databases section of your hosting account’s cPanel dashboard.
Here is a screenshot from the Bluehost control panel:
 Opening phpMyAdmin from CPanel
Clicking on the icon will open the phpMyAdmin interface. You need to select your WordPress database from the left column.
After, that phpMyAdmin will display all tables in your WordPress database. You will be making changes to the wp_users and wp_usermeta tables.
 You Will Be Making Changes to the wp_users and wp_usermeta Tables
Adding a User to the wp_users Table
First, you need to find the wp_users table and click it. This will show the users currently listed in the table.
Notice in the screenshot below that there are two user IDs in our demo website’s table, 1 and 2. When we create a new user for our demo site, we’ll give it the ID 3.
You need to click the ‘Insert’ tab at the top of the screen so you can insert the information for a new admin user.
 Click the Insert Tab
Add the following information to the fields on the Insert form:
ID: pick a unique number (in our example, we’ll use 3)user_login: the username that will be used when logging inuser_pass: add a password, and make sure to select MD5 in the function menu (see the screenshot below)user_nicename: the user’s full name or nicknameuser_email: the user’s email addressuser_url: your website addressuser_registered: select the date and time the user was registered using the calendaruser_activation_key: leave blankuser_status: set this to 0display_name: the user’s full name or display name
 Fill In the Fields for the New User
Once you have finished, make sure you click on the ‘Go’ button to store the new user.
Adding a User to the wp_usermeta Table
Now you need to find the wp_usermeta table and click it. After that, you should click on the ‘Insert’ tab as you did in the previous step.
Next, you need to add the following information to the Insert form:
unmeta_id: leave this blank (it will be auto-generated)user_id: the user ID you used in the previous stepmeta_key: this should be wp_capabilitiesmeta_value: insert this: a:1:{s:13:"administrator";s:1:"1";}
 Fill In the Fields for the New User
After that, when you scroll down you should find fields for a second row. You need to add the following information:
unmeta_id: leave this blank (it will be auto-generated)user_id: the user ID you used in the previous stepsmeta_key: you need to enter wp_user_levelmeta_value: 10
 Fill In the Fields for the New User
When you have finished entering the information into the fields, you need to click the ‘Go’ button. Congratulations, you have created a new admin username.
Now you should be able to log in to your WordPress admin area using the username and password you specified for this user.
As soon as you log in, you need to navigate to Users » All Users, then click on the username you just created.
 Navigate to Users » All Users and Edit the New User
Now, without changing anything, scroll to the bottom of the page and click the ‘Save’ button.
This will allow WordPress to clean up the user you just created and add some needed information
Article ID: 118
Created On: Thu, Dec 8, 2022 at 2:26 PM
Last Updated On: Thu, Dec 8, 2022 at 2:26 PM
Authored by: Saeed Nobakht [[email protected]]
Online URL: https://www.navel.ir/article/how-to-add-an-admin-user-to-the-wordpress-database-via-mysql-118.html